709-218-7927 The Landfall Garden House 60 Canon Bayley Road CANADA A0C 1B0 |
|---|
Error! Not a valid filename.
Text Columns
We will set the entire document to be 2-column text, then make a section specifically for the image as 3-column text, with the image standing alone in the central column.
The easiest way to do this is to proceed in a series of small steps. Small steps always work; large steps rarely work.
I use the Format, Columns command to set the entire document, a single section at this point, into two-column layout.
I fill the document with fake text.
At the point where the image should start, I use the Format, Columns command to set two-column layout “from this point forward”.
At the point where the image should finish, I use the Format, Columns command to set two-column layout “from this point forward”.

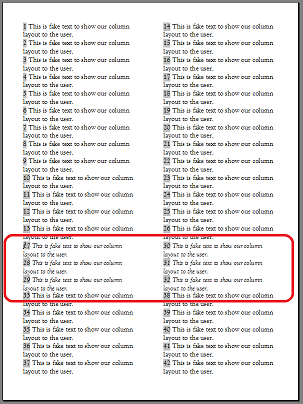
In the image above I have italicized the text in the second section and outlined the area with a red rectangle.
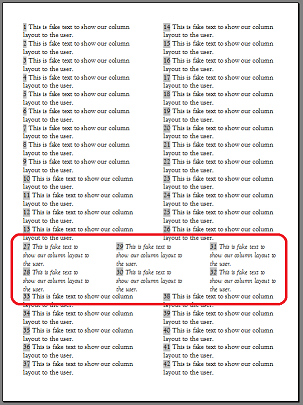
The final step is to place the text cursor in the second section and use the Format, Columns command to reset the number of columns to three “In This Section”

You can see the effect in the image above.
Do not be fooled by the apparent block isolated for our image. We still have equal-width column spacing here. We will change the central column to be the width of our image.

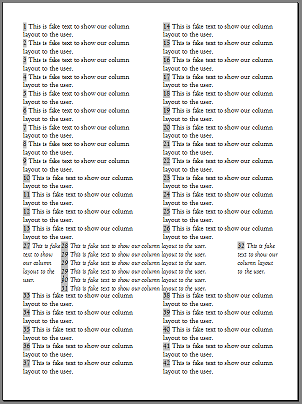
Here I am doing my best to set a 2-centimetre column each side of a 9-centimeter column.
I chose spacing around the pre-printed image when I elected for a 9x5 image so here I don’t have to worry about setting spacing between columns.

And here we are!
We still have some alignment to do in the vertical sense; our text-typing will determine where we finish typing text in one section and move to the next.
Text alignment and even word-length will come into play as we try to fill our spaces in a manner pleasing to the eye.
Next: Adjustments
709-218-7927 CPRGreaves@gmail.com Bonavista, Thursday, December 17, 2020 7:35 AM Copyright © 1996-2020 Chris Greaves. All Rights Reserved. |
|---|