709-218-7927 The Landfall Garden House 60 Canon Bayley Road Bonavista, Newfoundland CANADA A0C 1B0 |
|---|
Vibrating Rack
The vibrating rack is the regular rack suspended by cords and/or tension springs, or sitting on compression springs (such as valve springs from a car engine).
This mounting allows the rack about one inch of horizontal travel along its length, or perhaps across its width.
The YouTube videos usually involve a $100 oscillating motor which, as far as I can see, wobbles when in use. The motor being strapped or bolted onto the rack, the assembly vibrates.
I plan a proof-of-concept using my reciprocating saw (sans blade!) strapped to a rack.
This video on YouTube DIY Vibrating Soil & Compost Sifter has inspired me. I like the overall design – the small footprint and low weight. These characteristics lead me to believe that I want a light-weight portable sieve so that I can operate where the soil is. I ought not be in the business of barrowing old soil TO a sieve and then barrowing it AWAY from a sieve,
I like too the approach of starting at the core and developing outwards: in this case it means thinking about the sieve itself – the wire mesh on/in a wooden frame.
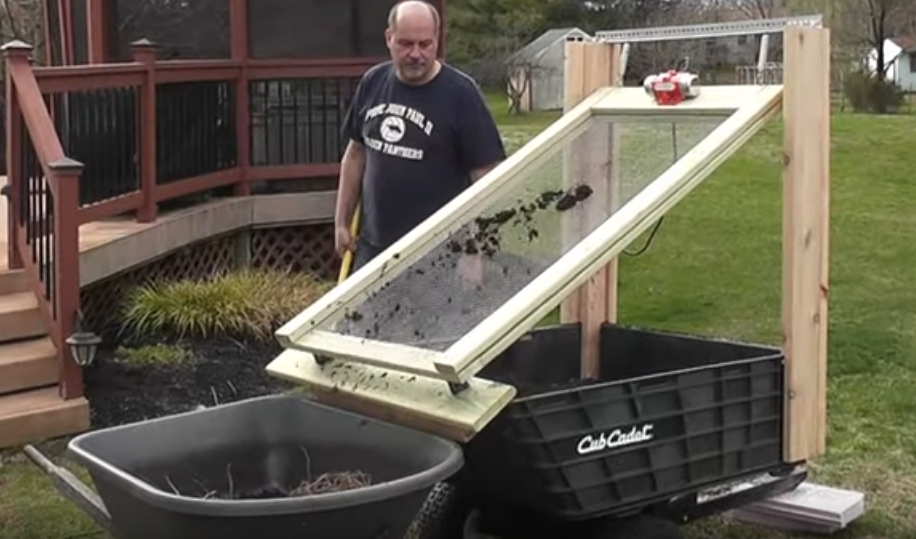
This is a screen shot of the sieve in operation.
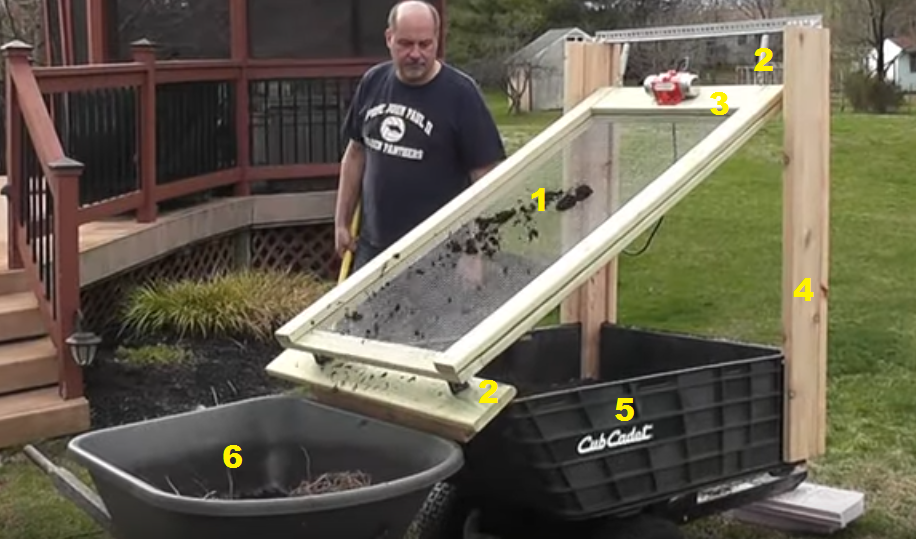
Here I have identified the six critical components:-
(1) The sieve frame. Russ Lesinski explains in the video (1m 30s) that he used what was available to him. I have three mats working on my drop-sieve, so I can use whatever grades of mesh I have, or buy different meshes. In particular since I deal with rocky soil, compost, potting soil, grass clippings and more, I can assemble a set of interchangeable screens and just hook them in and out on the suspension springs.
I could use my three existing frames on a proof-of-concept, using the principle “If it doesn’t work, you’ve lost nothing, but if it works you’ve won”
That makes me think that each frame could have a cable at each corner, the cable hooking onto the suspension springs. That way I can suspend frames of varying sizes according to my situation; any length and any width. Springs suggests to me that I need to measure the weight/load at the top and the bottom and buy springs whose compression/tension range accommodates those ranges.
I have been thinking of longer, narrower screens, maximizing the time material spends being sieved at any angle. Watch the video; Russ is using a small load from a small shovel. A long screen means a graduated load under the sieve.
(2) The springs. Russ uses tension springs at the top and compression springs at the bottom. No springs? I can get by in a Proof Of Concept by using stout cord for suspension. The main thing at the top is that the frame is not rigidly attached to the structure Suspension springs are best, but cord works too.
I could use cord at the foot of the frame, too, as long as it can be hooked to the base of the structure.
So think cords with S-hooks at each end; the S-Hooks would attach to S-hooks on cords fixed to the structure.
(3) The vibrator. Russ bought a vibrating motor. I might strap down my reciprocating saw for the Proof Of Concept.
Any form of vibration should work, albeit at different speeds. A wind-powered piston from an off-centre wheel should work, although the real-time rate of production will vary as the wind blows, and we run the risk of blowing dust during operation.
(4) The structure. I admire Russ’s use of his tractor-hauled tub for the harvest and, of course, a wheelbarrow to receive the coarse grades. Two wheel barrows would do the trick.
Enhancements to the sieve include skirts made from old bags or sheets of plastic, funneling material into a narrow chute.
My structure can be a simple braced structure of 4”x2” lumber, light enough for me to stand inside it and pick it off the ground and walk it to the next site. (see below)
I can bolt the structure together with a couple of dozen quarter-inch bolts and nuts/wing nuts so that the legs can be adjusted for height while maintaining the function of the sieve.
Four independently adjustable legs would allow me to site the sieve on a sloping plot of land.
So working on a garden bed the sieve can be mounted low on the structure (less lifting of soil, less dust blowing) while working in a driveway, the sieve can be mounted high for wheelbarrows or bins.
(5) and (6) See the points above. Judicious use of flexible chutes and funnels and wheeled barrows make for easy collection and removal.
Sites
Over the past three years I have sieved soil in my driveway, and I have sieved soil on a 10’x10’ area just off the driveway. Last fall I made a 24’x16’ raised bed that surrounded my two original beds. The new bed is virtually empty. It consists of the two original beds plus at least twice as much area of lawn.
The bed sides are 10” timber; I believe that with 10” of soil I need not bother removing the turf or digging out roots.
Last fall I dumped 24 sacks of sawdust into the 24 4’x4’ partitions marked out with nylon cord.
My plan is to mount the vibrating sieve In the centre of the plot and work outwards, so that initially I am sieving whatever material is at hand alongside the sieve, but trying to be shoveling from the bed-side side of the sieve and depositing sieved material towards the centre of the bed. After a months work I ought to have a raised bed about 14’x6’ for vegetables and flowers for the 2024 season.
Outside the 14’x6’ area will be an area shaved down, made bare. I can continue sieving but now loading material from my 15 compost bins, again depositing sieved soil in the raised bed, but carting away coarse grades to the empty compost bins. (Part of my composting problem is that I do not have enough soil material to layer the grass when it arrives, as it does, up to a truckful per weekday in season.
Once the sieving process moves to the edge of the raised bed, I fancy arranging the vibrating sieve at right angles to the edge of the bed, so that sieved material falls directly under the sieve and the coarse grades shoot outside the bed and straight into a wheel barrow and hence to the compost bins.
Next steps
(a) Obtain cords, S-hooks, 2”x4” timber, bolts, washers, nuts
(b) Assemble the structure
(c) Using existing frames, suspend them from the structure.
(d) Strap the reciprocating saw to a frame.
(e) Start shoveling
Notes on the video
(a) 0m16s Minimize storage space. I would like to leave the sieve out for the season March-November, but might break it down at the end of the season and store it in the shed.
(b) 0m20s I suspect that most of my sieving will be on-site, in the sense that I will let sieved material drop to the ground. I might straddle the sieve over my two driveway beds and work my way down the beds, sieving and dropping as I go, perhaps adding shovels of grass clippings along the way, making a self-composting bed for flowers. I will be plucking bulbs out of the coarse grades for immediate replanting.
(c) 0m27s I will want the coarse grades to be channeled carefully into a wheel barrow for easy removal to another site. The output chute must capture every bit of coarse grade material.
(d) 0m32s I will be using a stand-alone structure. Rather than a total set-up and tear-down, I probably want a means to unhook from the structure, and easily be able to walk the structure along or away from the site. I need to think about this. At the very least un-hooking a frame ought to leave the structure light enough to walk.
I briefly thought of large wheels to wheel the sieve elsewhere, but now I think a broad platform for a pull-trolley might make more sense; for one thing such a trolley can be used to haul sacks of grass, sawdust, or bins of old soil to a sieving site.
The stand alone structure will be braced four ways, but should suffer only a little vibration, at least using hooked cords in the Proof Of Concept.
(e) 1m28s I could use just one frame, sandwiched or recessed as show, and then have varying sheets of mesh (“mats”) that just lay on top of the base mesh. The base mesh might be 6” construction mesh, on which I lay a 1-cm mesh sheet.
A 1” sheet of mesh would turn my sieve into a mixer (sawdust, grass clippings and soil)
(f) 2m40s a rheostat sounds good, but I suspect that initially I will control the load on the motor by limiting the loads from my shovel, and I will govern the rate of sieving by the angle of the frame. A flat angle will give a long period of sieving, a steep angle will be a quick-sieve pass.
If I were sieving live material such as worms, I would want a slow and gentle vibration.
(g) 2m43s baffles. I conceive plastic bags tacked at strategic points to limit the amount of sprayed material. To my mind even sieving directly to the bed needs little more than a quick raking afterward to level the soil.
Sunday, January 14, 2024
For work on (what is for me) a massive scale, such as populating the 24’x16’ raised bed – needs a foot of compacted soil, so about one thousand cubic feet of sieved soil – I want to populate a serious domestic area.
That sounds like the largest sieve I can install, with a long but thorough sieving period, so a low-angle and perhaps a reduced speed of vibration.
I can then toss several shovels of soil at the head of the sieve and walk away to grab another mug of tea, or get rid of a mug of tea, or wheel the barrow back to the compost bins and fetch another load of raw material.
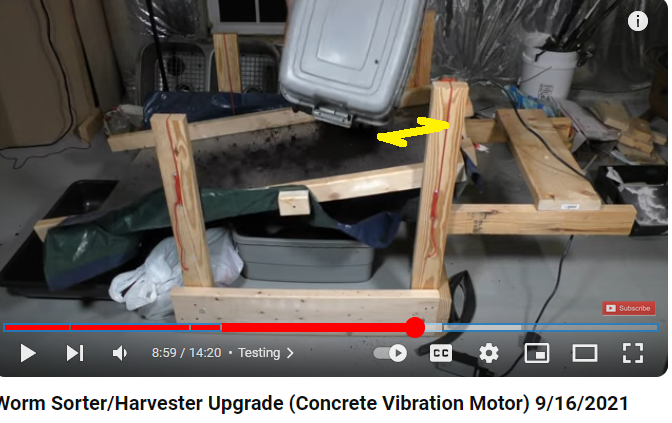
Here is a screen clip from a different video . Note that the bin is being tipped (or the shovel is being unloaded) at a distance from the top end of the sieve. My yellow line represents the distance to the hidden top-end of the sieve. To my mind this is a waste of sieving opportunity.
Try installing a funnel/chute that feeds directly to the top-end edge of the sieve and make use of that extra six or eight inches.
If the chute is vibrating, a very coarse pre-sieve grate can be placed near the top to screen out ridiculously large stones of sticks. The chute can then be lifted off and dumped upside down in a “seconds” pile for return to the compost bins or for a secondary pass with a different screen gauge.
The advantage of in-situ sieving is that we do not need to worry about occasional ejection from the sides and ends. My aim is not to provide industrial quality soil that does not exceed a specific size, but to do a “pretty good job” of sieving for a vegetable plot and/or to mix components.
I specifically want to sieve out all plastic materials and other inorganic solids such as nails, bolts. Concrete shards and so on. I suspect that this will be a second phase – determining a particular screen size and gradient and speed to discriminate rogue materials.
Consider bagging the sieved material for direct sale/gift to consumers.
A sieve can sort out tubers and bulbs.
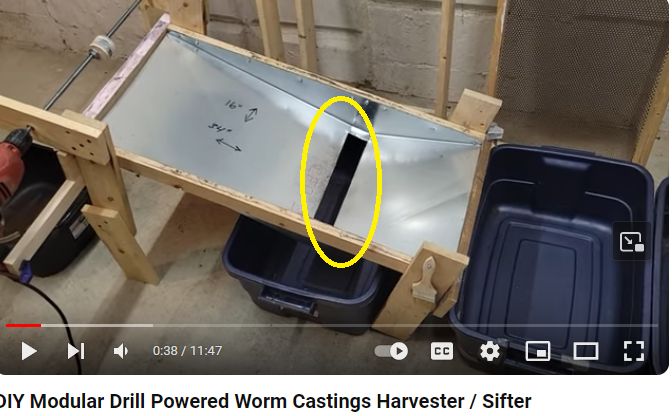
This video shows a narrow-throat funnel as the smallest part of a rectangular sieve. The funnel may as well be a fixed part of a basic frame that starts with the coarsest mesh available, mats of finer mesh laid atop. The grain of that coarse mesh determines the size of the funnel aperture.
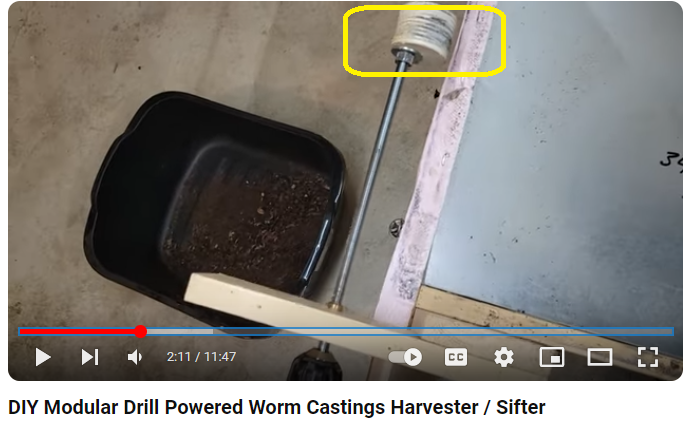
The same video shows a simple cam made from circular wooden disks glued to form a boss. The video uses a multi-stack set of trays to deliver the same set of grades on a linear trail of bins.
The same video uses a vertical shaking as distinct from a lateral shaking.
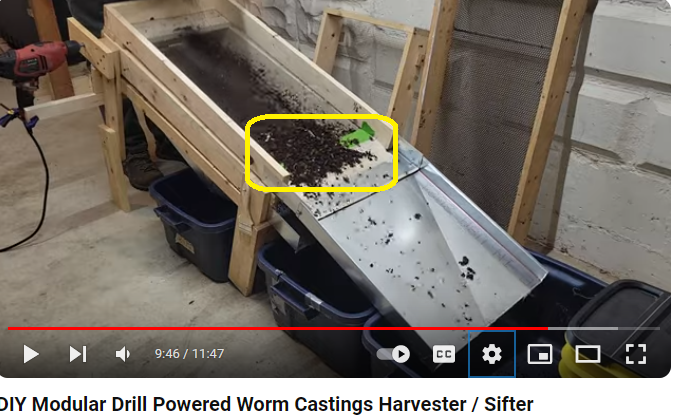
If the angle is too shallow a sieve tends to choke at the lower end; I have seen this so often on my percussion sieve. The idea of using a 2” brush to facilitate an automated system is just ludicrous.
709-218-7927 CPRGreaves@gmail.com Bonavista, Thursday, September 26, 2024 8:45 AM Copyright © 1990-2024 Chris Greaves. All Rights Reserved. |
|---|
Tuesday, January 16, 2024
Valve springs at the 5m 39s mark